
The complete guide
Raising healthy seedlings in starter trays
Seed Starter Tray , Improve Germination Rates From Day One
Pack of x5
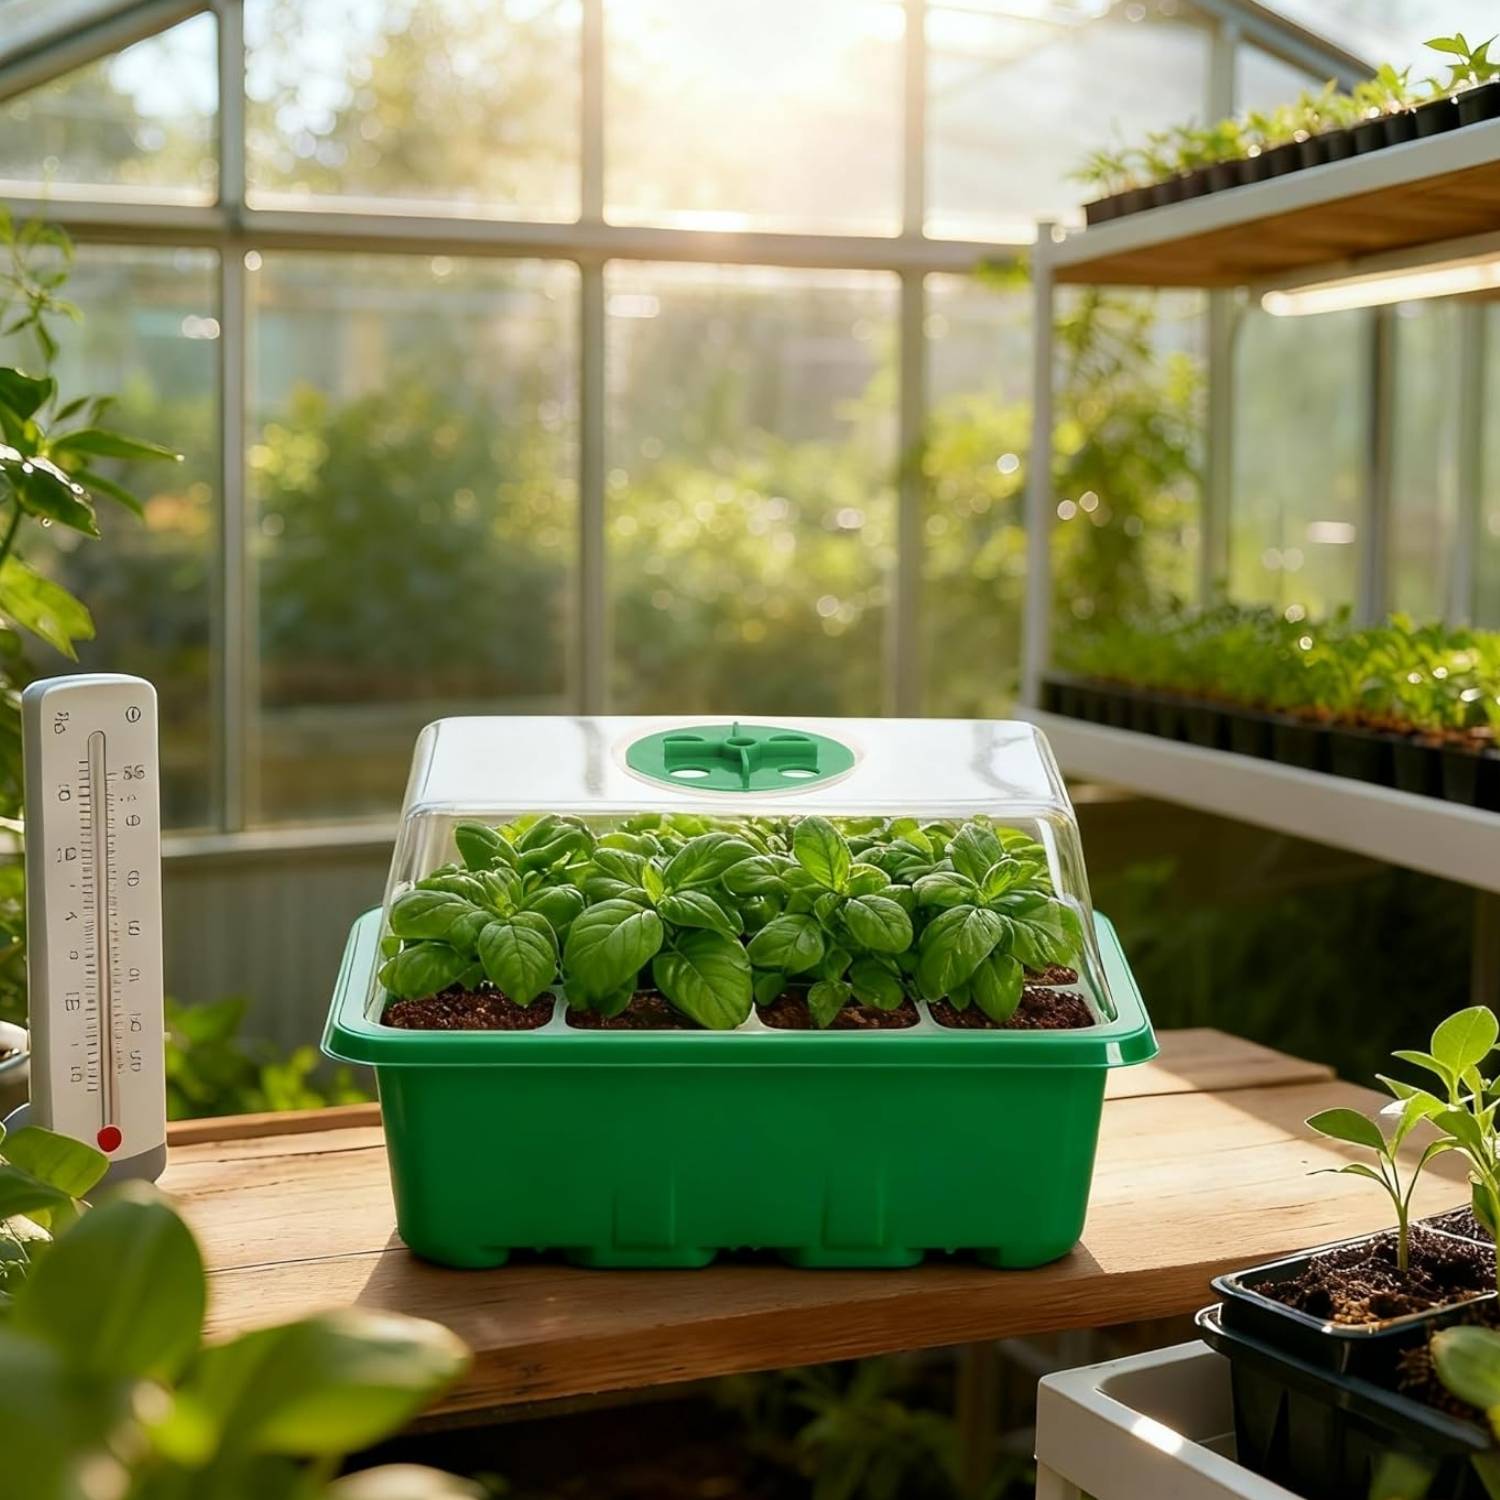
This seed starter kits will help improve your seed germination and survival rate. Finally a humidity dome for seed starting is an easy thing for every gardener.
SPECIFICATIONS
Pack of x5
Precision Climate Control
Fine-tune your seedling environment with adjustable vents that let you manage temperature and humidity exactly how your plants need it. Take complete control over growing conditions from germination to transplant-ready seedlings.Smart Drainage System
Each cell features strategically placed drainage holes that prevent waterlogging and root rot. Excess moisture escapes while the growing medium retains optimal hydration, creating the perfect balance for vigorous, healthy root development.Mini Greenhouse Environment
Transform any space into a productive nursery with five complete greenhouse systems. Clear humidity domes lock in moisture and warmth, creating ideal germination conditions that dramatically improve success rates across all seed types.Built to Last Season After Season
Constructed from durable, UV-resistant plastic that withstands years of regular use. Lightweight design makes moving trays effortless, while rigid construction prevents flexing and spills. Clean, store, and reuse season after season for outstanding long-term value.Everything You Need to Start Growing
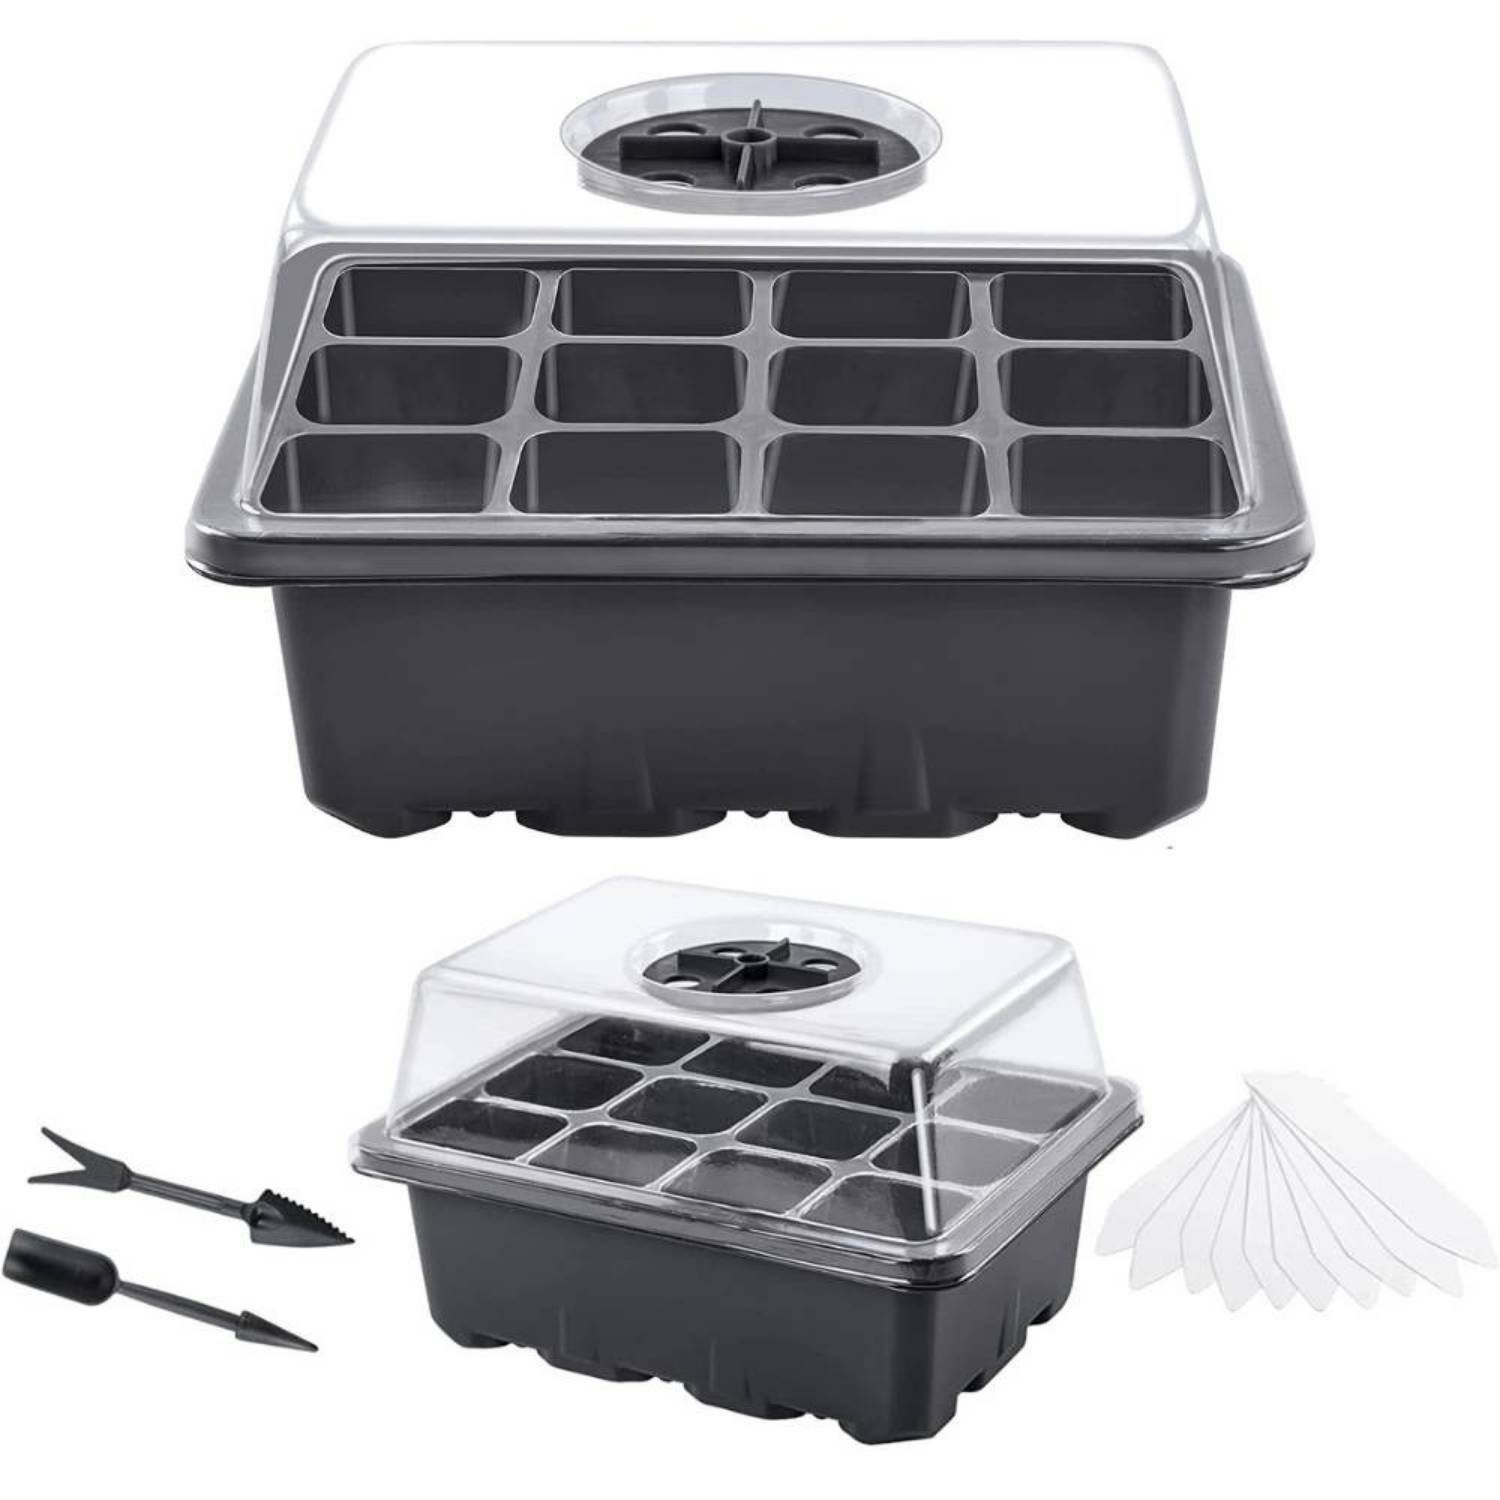
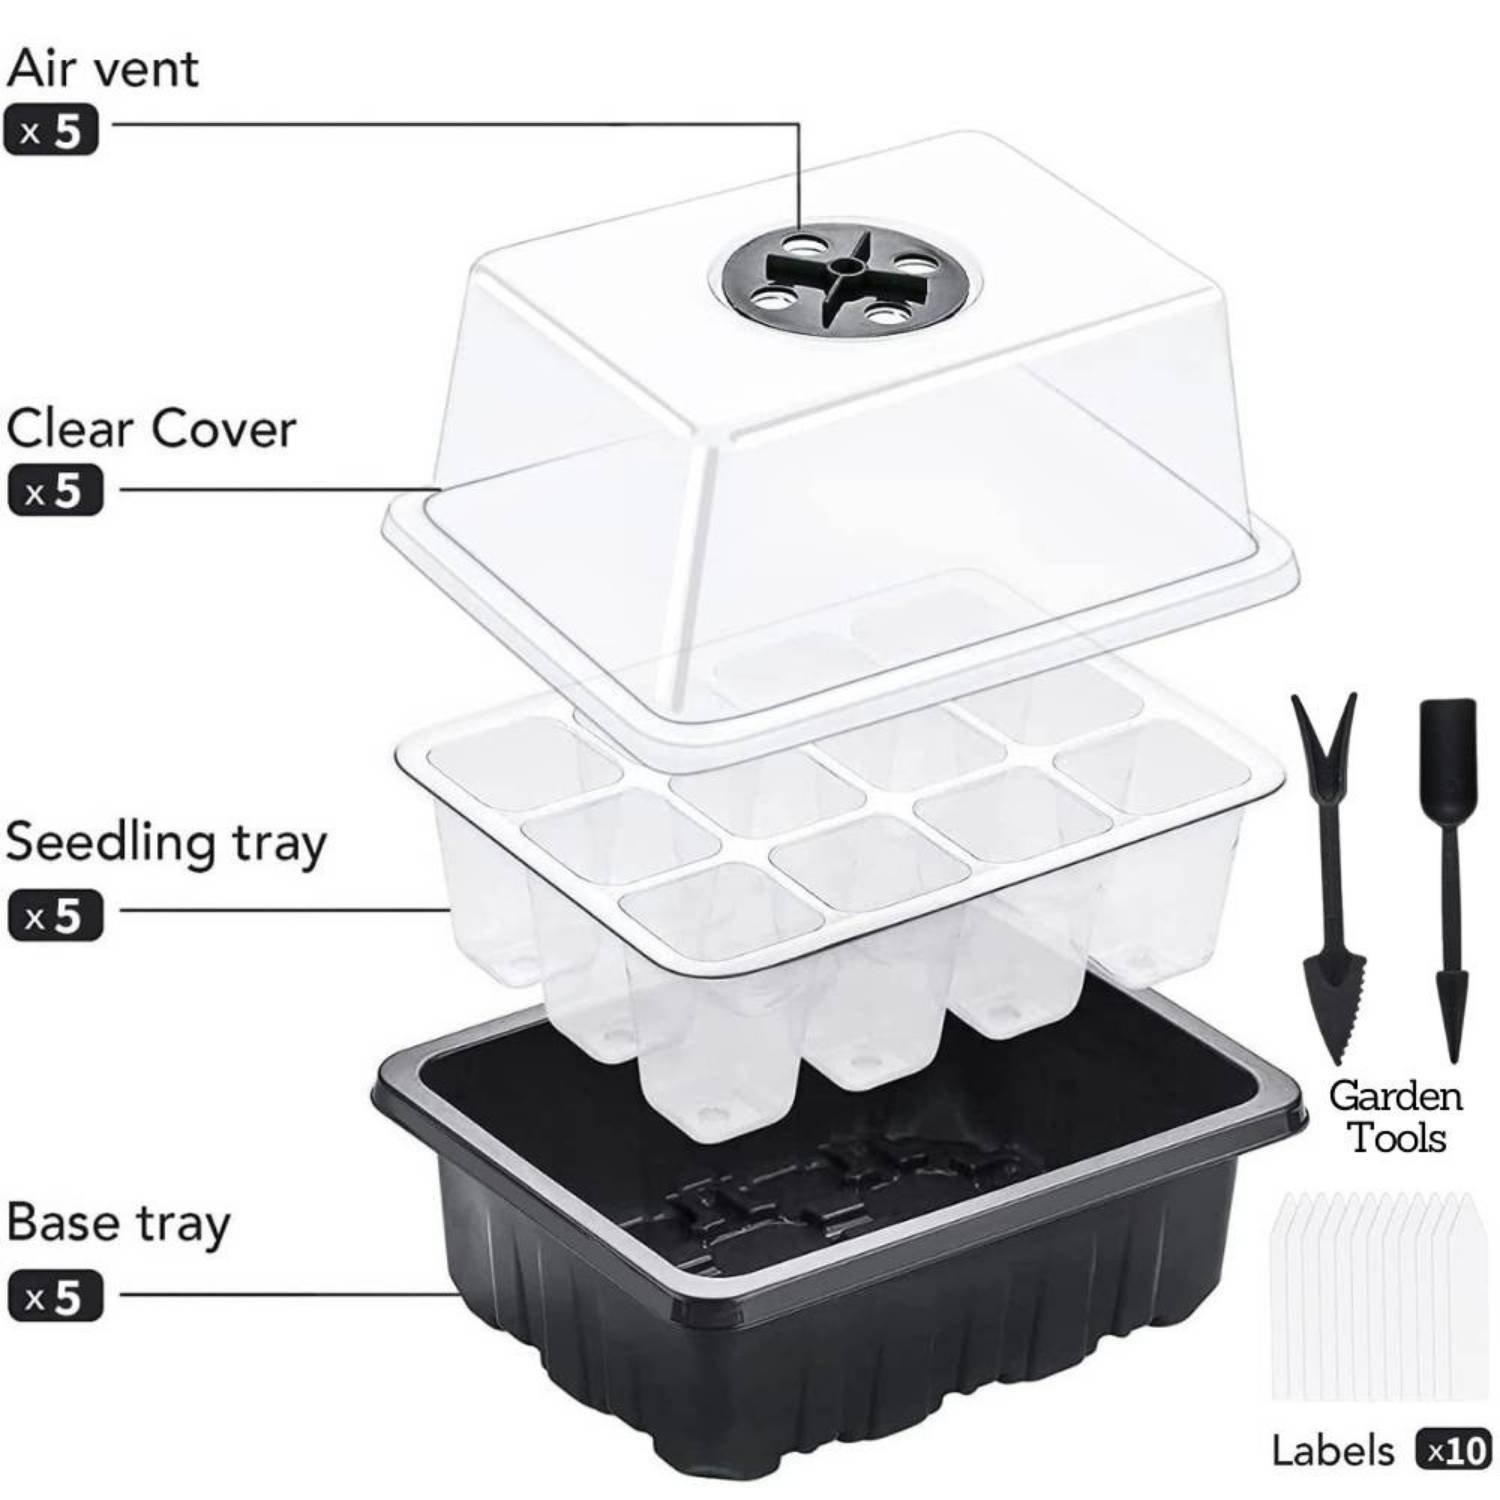
This comprehensive kit includes five seed trays with individual cells, five watertight base trays for mess-free watering, five adjustable humidity domes, and plant labels to keep your varieties organized. No additional purchases necessary, just add seeds and growing medium to begin.Have you ever planted seeds directly into your garden only to watch most of them fail to germinate, get eaten by birds, or simply disappear without a trace? Or perhaps you've started seeds indoors on windowsills using whatever containers you had available, only to end up with leggy, weak seedlings that struggled to survive transplanting? The frustration of wasted seeds, lost time, and disappointing results is something every gardener experiences until they discover the game-changing difference that proper seed starter trays make.
Starting seeds successfully isn't about luck or having a green thumb it's about creating the right environment from the very beginning. A quality seed starter tray transforms seed germination from unpredictable guesswork into a reliable, repeatable process that delivers healthy seedlings ready to thrive in your garden. Whether you're growing vegetables for your family's table, starting flowers to beautify your landscape, or propagating herbs for your kitchen, the right seed tray kit makes all the difference.
In this comprehensive guide, we're exploring everything you need to know about seedling starting trays. From understanding why these specialized tools outperform improvised alternatives to mastering the techniques that deliver germination rates you never thought possible, you'll discover how serious gardeners stack the odds in their favor right from seed. Let's dive into the world of successful seed starting.
Understanding Seed Starter Trays: More Than Just Containers
Before we explore specific features and techniques, let's establish exactly what makes seed starter trays different from simply planting seeds in any available container.
What Defines a True Seed Starter Tray System
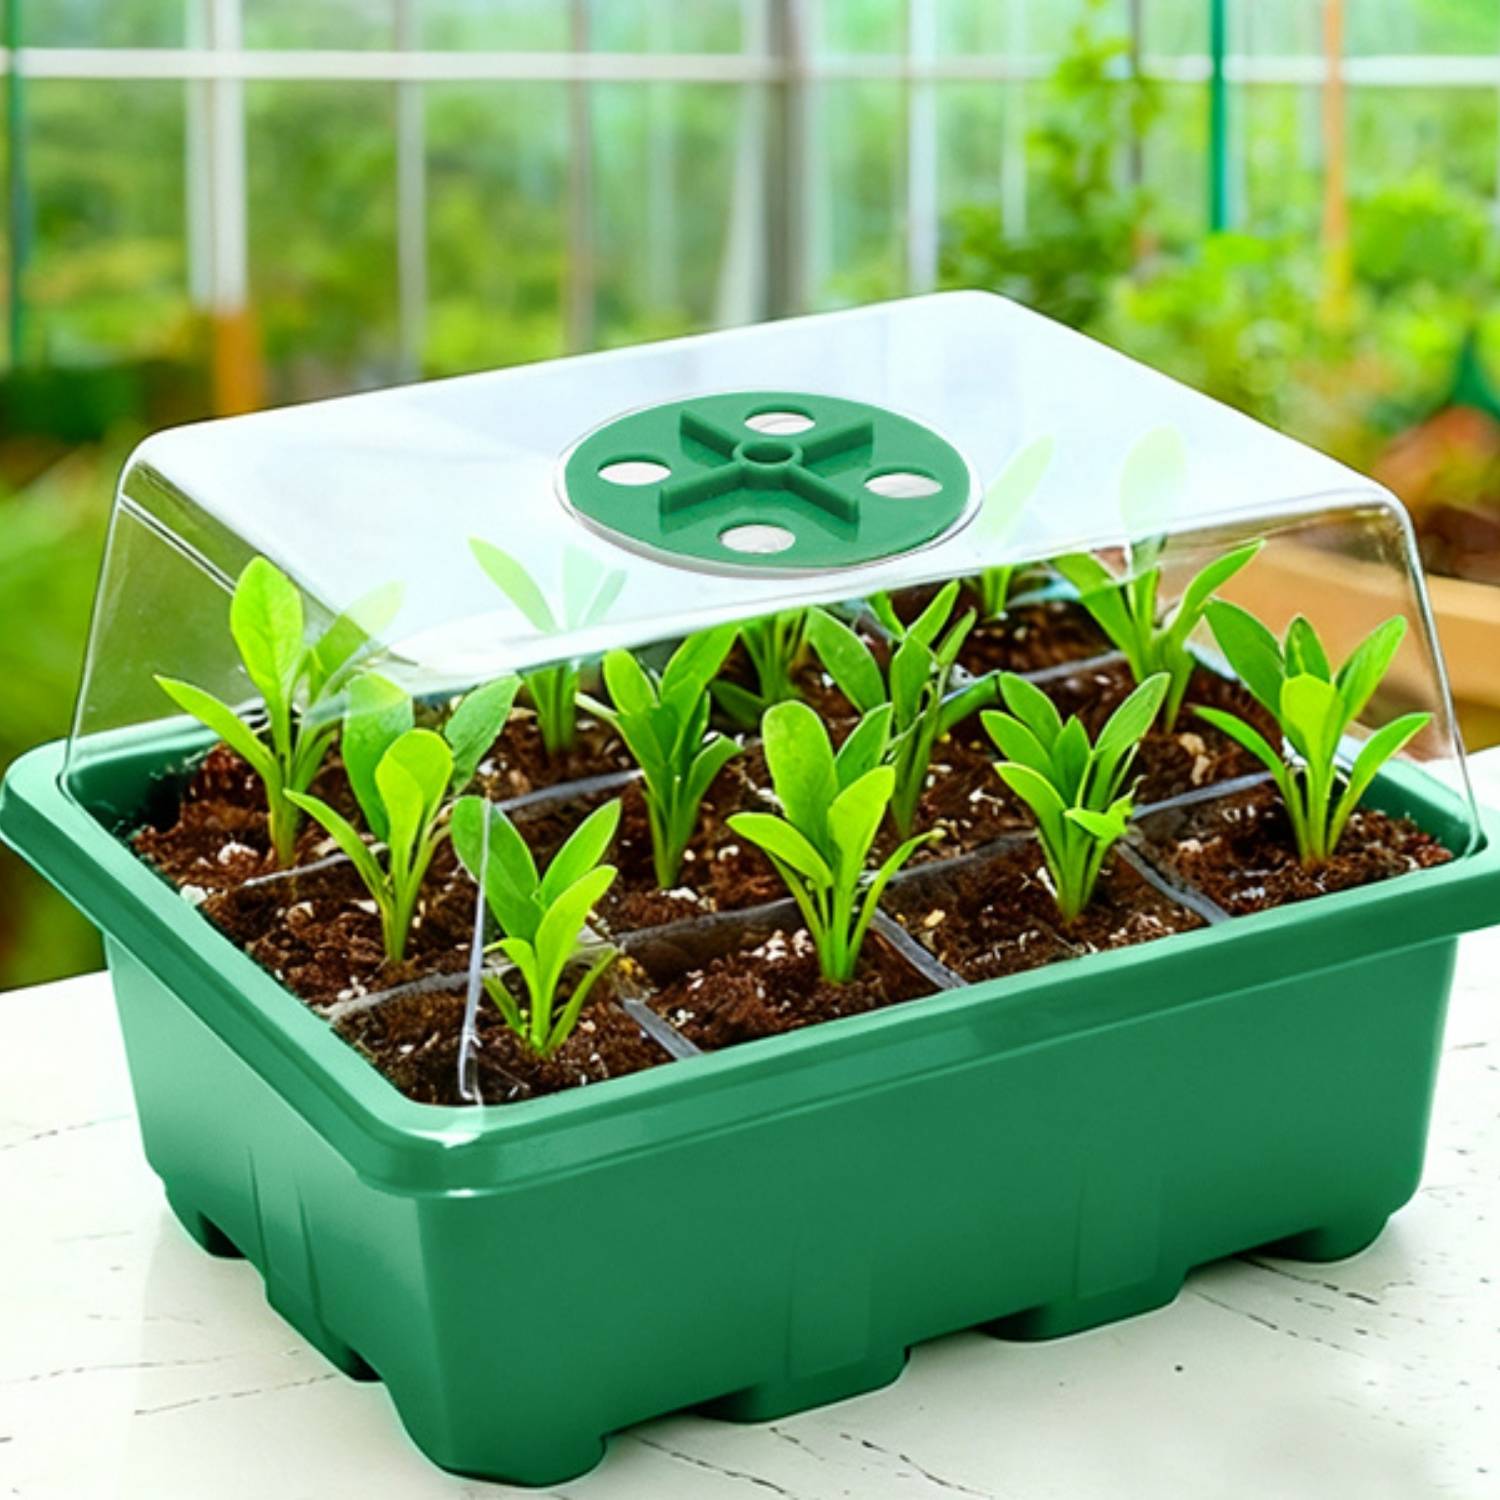
A proper seed tray kit isn't just a plastic container with soil in it. It's an engineered system designed to create optimal conditions for germination and early seedling development. Quality seed starter trays typically consist of three essential components working together: individual cell compartments that separate and organize seeds, a solid base tray that catches excess water while maintaining stability, and a clear humidity dome that creates a miniature greenhouse environment.
This three-part system addresses the fundamental needs of germinating seeds. Seeds require consistent moisture, appropriate temperature, adequate oxygen, and protection from environmental extremes. Random containers from your kitchen might provide a place to put soil and seeds, but they don't optimize these critical factors the way purpose-built seedling starting trays do.
The Science Behind Successful Germination
Understanding what seeds need to germinate helps you appreciate why seed starter trays work so well. When a seed absorbs water, it triggers a remarkable transformation. The seed coat softens, internal enzymes activate, and the embryonic plant begins converting stored energy into growth.
This process requires specific conditions. Temperature affects the speed of chemical reactions, too cold and germination slows or stops entirely, too hot and proteins can denature. Moisture must remain consistent, seeds that dry out after beginning germination often die, while excessive water drowns seeds by excluding oxygen. Light requirements vary by species, with some seeds needing darkness and others requiring light exposure to germinate.
Quality seed tray kits create and maintain these conditions far more effectively than improvised alternatives. The humidity dome traps moisture, reducing the need for frequent watering that can wash away seeds or compact soil. The individual cells prevent roots from different plants from intertwining, making transplanting dramatically easier and less traumatic for young plants.
Key Features That Separate Quality Seed Starter Trays From Basic Options
Not all seedling starting trays deliver equal results. Certain features separate products that genuinely improve your success rate from those that simply hold soil.
Humidity Control Dome: Your Miniature Greenhouse
The clear dome that covers your seed starter tray creates a controlled microclimate that's crucial for consistent germination. This dome traps moisture that evaporates from the soil surface, creating humid conditions that keep the growing medium consistently moist without requiring daily watering.
This humidity control matters enormously for germination success. Seeds exposed to fluctuating moisture levels, wet in the morning after watering, progressively drier throughout the day, often germinate unevenly or not at all. The humidity dome eliminates these fluctuations, maintaining the steady moisture that seeds need.
Quality domes also allow light transmission while diffusing direct sun. This prevents the scorching that can occur when seeds in containers are placed in bright light. The diffused light provides energy without the heat concentration that can literally cook germinating seeds.
Drainage Holes: Preventing the Silent Killer
Each individual cell in quality seed tray kits includes drainage holes at the bottom. These holes might seem like a minor detail, but they prevent what's probably the most common cause of seed starting failure: waterlogged soil that drowns seeds.
Seeds and young seedlings need both water and oxygen. Soil that stays saturated excludes oxygen, leading to seed rot or damping-off disease in young seedlings. Proper drainage allows excess water to escape while retaining sufficient moisture in the growing medium.
The base tray catches this drainage, preventing water from damaging surfaces while allowing you to monitor moisture levels. When you water seedling starting trays from above, excess water drains into the base tray. You can then discard this excess or allow it to be reabsorbed gradually, depending on your watering strategy.
Individual Cell Separation: The Transplanting Advantage
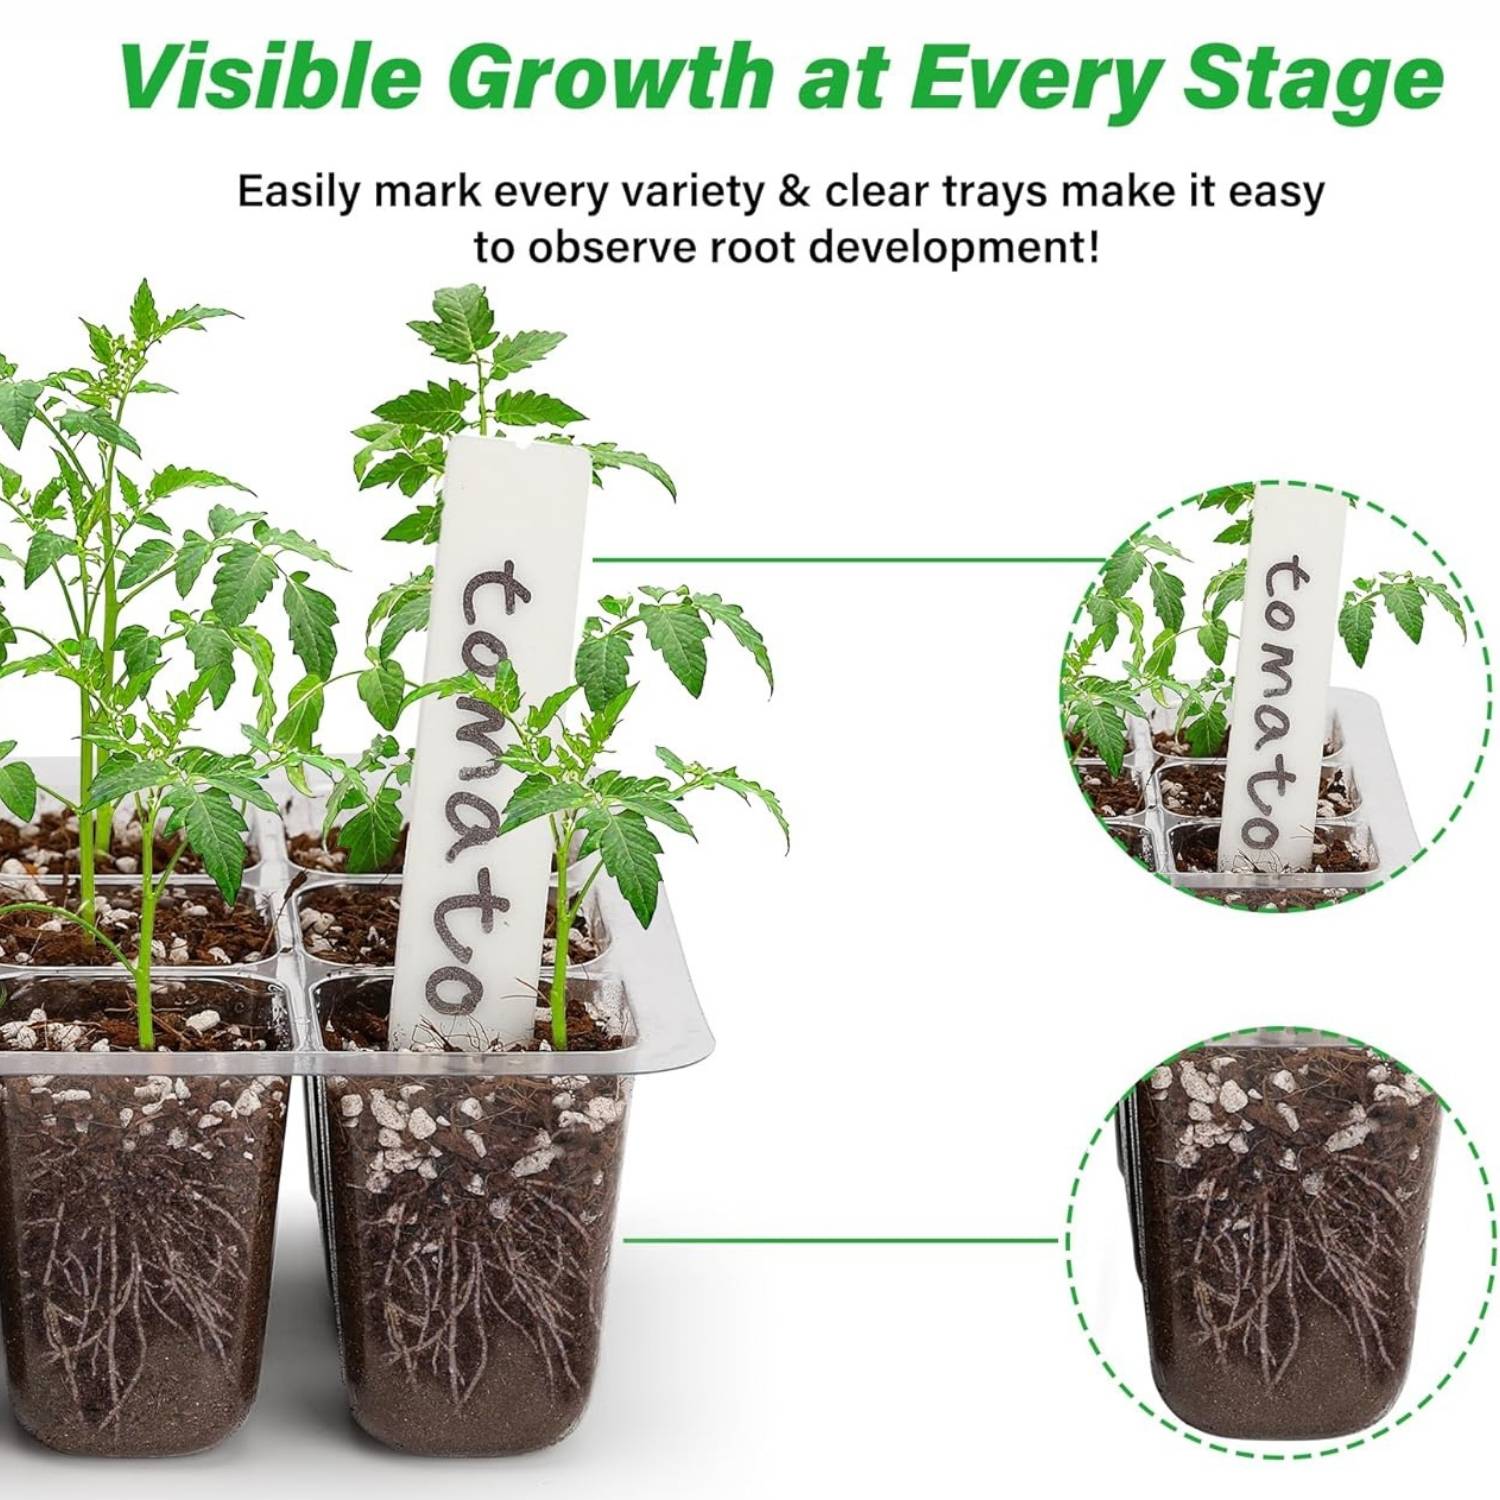
Individual compartments in seed starter trays deliver benefits throughout the entire seed-to-garden process. During germination, separated cells prevent strong seedlings from shading out weaker neighbors. As seedlings grow, the divisions prevent root systems from intertwining.
This separation becomes crucial when transplanting time arrives. Seedlings grown in open trays or shared containers develop interconnected root systems. Separating them for transplanting inevitably damages roots, causing transplant shock that sets back growth or kills plants outright.
With individual cells, you simply pop out each root ball intact. The entire root system transfers to its new location undisturbed. Seedlings experience minimal transplant shock and establish quickly in their permanent locations.
Material Quality and Durability
The material construction of seed tray kits affects both immediate performance and long-term value. Quality PVC or similar plastics resist cracking, warping, and degradation from UV exposure and repeated use.
Cheaper trays made from thin, brittle plastic might work for a season or two but crack when handled, warp from temperature changes, or become brittle and unusable after sun exposure. Quality materials mean you can reuse your seedling starting trays season after season, year after year.
Durability also affects functionality during use. Flexible, flimsy trays are difficult to move when filled with wet soil, they bend and flex, potentially dumping cells or damaging fragile seedlings. Rigid construction means you can confidently move trays around as needed without disasters.
Types of Seeds Perfect for Starter Tray Systems
While you can start virtually any seed in proper trays, certain categories particularly benefit from this controlled environment.
Vegetable Seeds: Getting a Head Start on the Growing Season
Vegetables represent the classic application for seed starter trays. Starting vegetables indoors extends your effective growing season, allowing you to transplant established seedlings into the garden rather than waiting for soil to warm enough for direct seeding.
Tomatoes, peppers, and eggplants particularly benefit from early starting. These warm-season crops need long growing seasons to produce well, and starting them indoors six to eight weeks before your last frost date means you're harvesting ripe fruit weeks earlier than neighbors who direct seed.
Cool-season vegetables like broccoli, cabbage, and cauliflower also excel when started in seed tray kits. You can start these indoors during late winter, hardening them off and transplanting into the garden in early spring for harvests before summer heat arrives.
Flower Seeds: Creating Beautiful Landscapes
Annual flowers started from seed in seedling starting trays give you far more plants for your money than buying established transplants. A single packet of zinnia or marigold seeds can fill an entire border when started properly in trays.
Some flowers have tiny seeds that perform poorly when direct-sown. Petunias, begonias, and impatiens produce seeds almost too small to see. Starting these in the controlled environment of seed starter trays ensures they don't wash away, get buried too deeply, or dry out before germinating.
Herb Seeds: Fresh Flavors Year-Round
Culinary herbs started in seed tray kits provide fresh flavors throughout the year. Basil, cilantro, parsley, and other annual herbs grow beautifully from seed when given proper starting conditions.
Perennial herbs like oregano, thyme, and sage can also begin life in seedling starting trays before moving to permanent garden locations or larger containers. The controlled environment helps these often-slow germinating seeds get established reliably.
Step-by-Step Guide to Using Seed Starter Trays
Success with seed tray kits comes from following proven techniques that optimize conditions for germination and early growth.
Selecting the Right Growing Medium
The soil-like material you fill your seed starter tray with profoundly affects germination success. However, regular garden soil is absolutely the wrong choice for seed starting.
Garden soil contains weed seeds, disease organisms, and insects that can devastate seedlings. It also tends to compact when kept moist in containers, reducing oxygen availability and making it difficult for delicate seedling roots to penetrate.
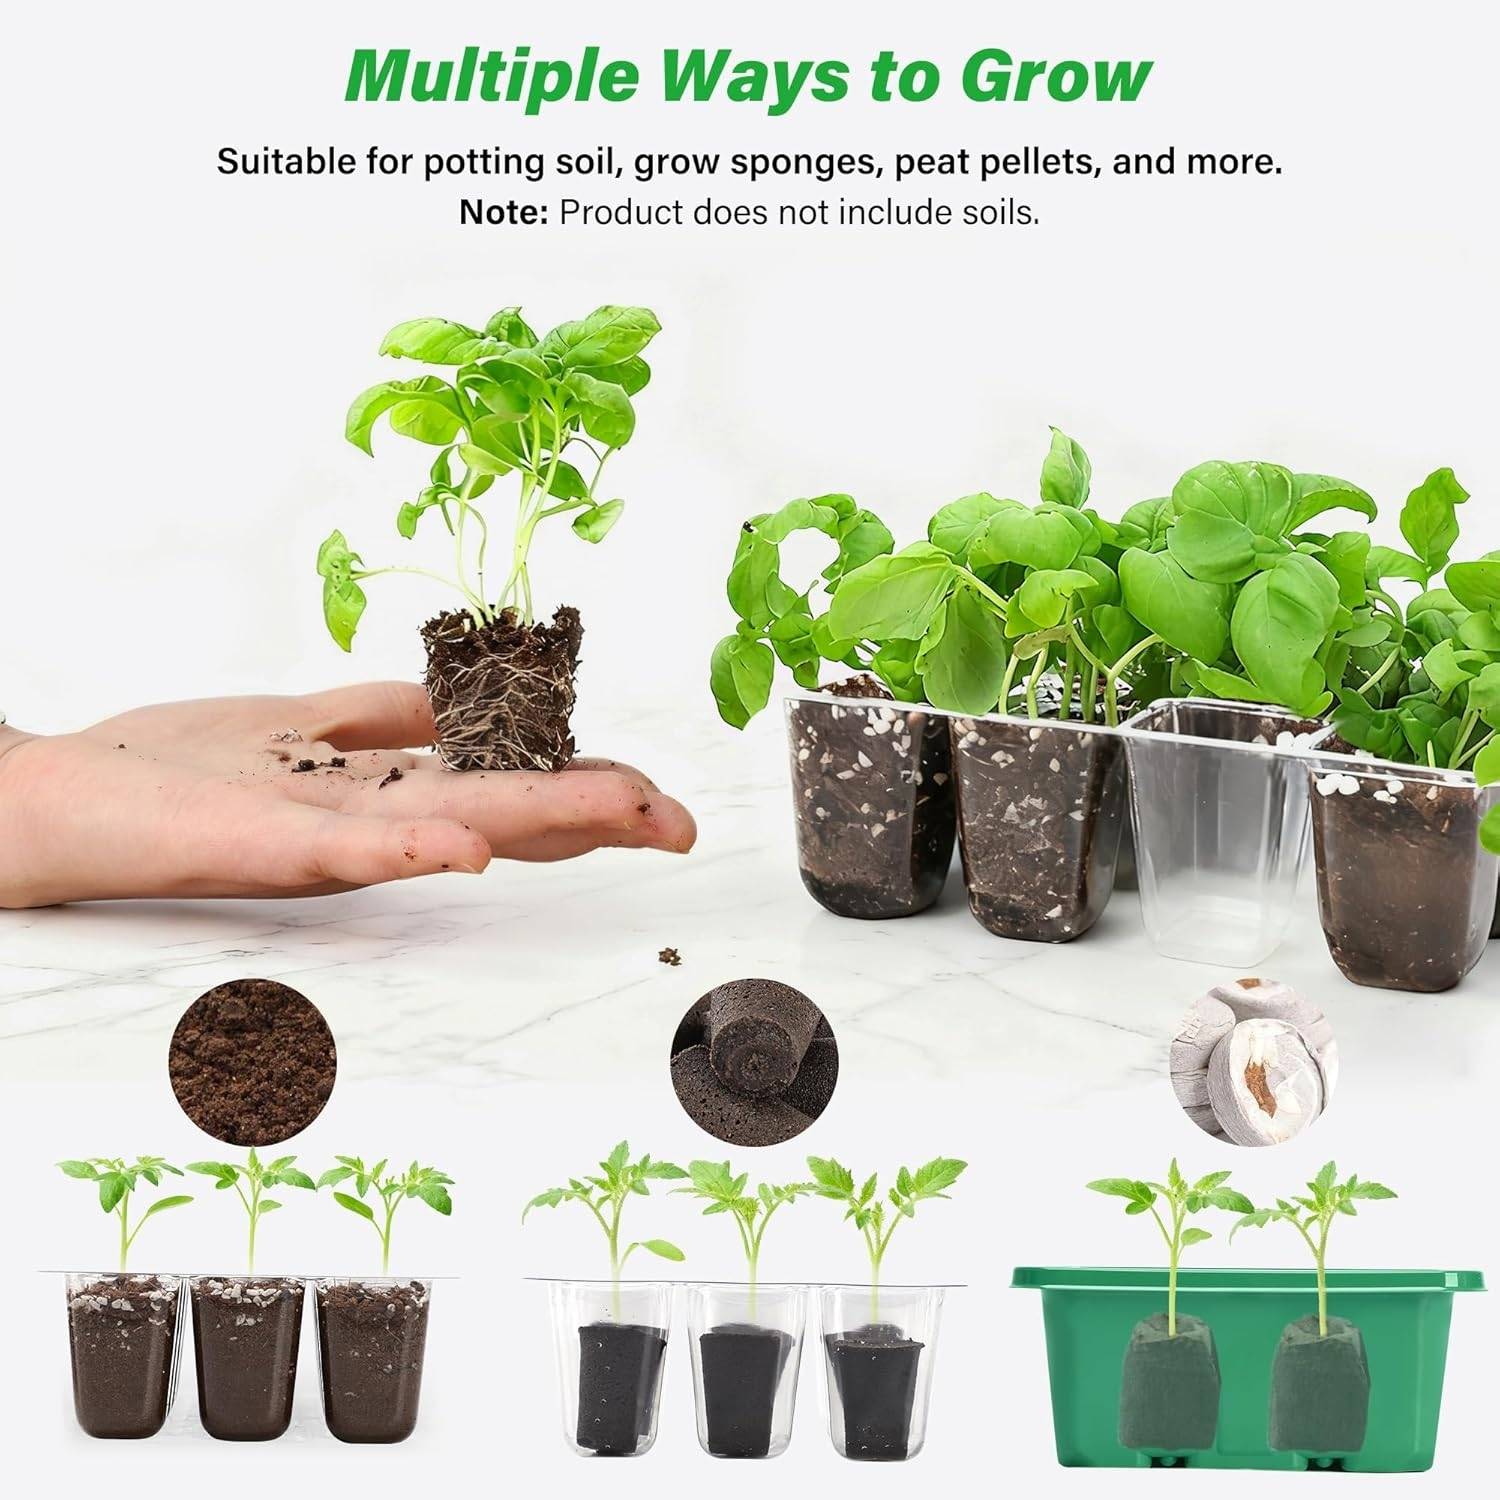
Seed starting mix, a sterile blend typically containing peat moss or coir, vermiculite, and perlite, provides ideal conditions. This medium retains moisture while draining excess water, stays loose and friable for easy root penetration, and contains no pathogens or weed seeds.
Pre-Moistening Your Growing Medium
Dry seed starting mix repels water initially, making it difficult to moisten evenly after filling your seedling starting trays. Pre-moistening eliminates this problem and ensures even moisture distribution from the start.
Place your seed starting mix in a large container and add warm water gradually while mixing thoroughly. You're aiming for the consistency of a wrung-out sponge, moist throughout but not dripping wet. This pre-moistened medium fills easily and provides immediate moisture to seeds.
Filling and Planting Your Seed Tray Kit
Fill each cell of your seed starter tray with pre-moistened growing medium, pressing gently to eliminate large air pockets while avoiding compaction. Fill cells nearly to the top, leaving just a small gap to prevent overflow when watering.
Create a shallow depression in each cell using your finger or a small tool. Planting depth depends on seed size, the general rule is to plant seeds at a depth equal to two or three times their diameter. Tiny seeds like lettuce or petunia go barely below the surface, while larger seeds like beans or squash plant deeper.
Place one or two seeds in each cell. Using two seeds provides insurance, if both germinate, you can snip away the weaker seedling, leaving the strongest to grow. This insurance approach costs a few extra seeds but dramatically improves your success rate with expensive or slow-germinating varieties.
Creating Optimal Germination Conditions
After planting, place the clear dome over your seed starter tray to create that crucial humid microclimate. Position the covered tray in a location with appropriate temperature and light for the specific seeds you've planted.
Most vegetable and flower seeds germinate good at temperatures between 18-24°C (65-75°F). Some gardeners use heating mats designed for seedling starting trays to maintain optimal temperatures, particularly when starting seeds in cool spaces or during winter months.
Light requirements vary by seed type. Many seeds germinate equally well in light or darkness, but some have specific requirements. Check your seed packet for guidance. Once seedlings emerge, however, all plants need strong light to grow properly.
Monitoring and Maintaining Moisture
The humidity dome dramatically reduces watering frequency, but you still need to monitor moisture levels. Lift the dome daily to check moisture and allow air circulation that prevents fungal problems.
The growing medium should stay consistently moist but never waterlogged. If the surface begins drying out, mist gently with a spray bottle or water carefully from below by adding water to the base tray and allowing it to be absorbed upward through the drainage holes.
Bottom watering, adding water to the base tray, often works better than watering from above, particularly for very small seeds. Top watering can wash away seeds or create uneven moisture distribution, while bottom watering provides even moisture throughout the medium.
Caring for Seedlings After Germination
Once seeds germinate, your seed tray kit transitions from germination chamber to seedling nursery. This phase requires different care to produce strong, healthy plants ready for transplanting.
Light Requirements for Healthy Growth
Seedlings need substantially more light than germinating seeds. Without adequate light, seedlings become "leggy", tall, thin, and weak as they stretch desperately toward any available light source.
A sunny windowsill might seem sufficient, but it rarely provides enough light intensity for stocky, vigorous growth. Even south-facing windows in winter don't deliver the light duration and intensity seedlings need.
Supplemental lighting solves this problem. Inexpensive shop lights or specialized grow lights positioned a few inches above your seedling starting trays provide the strong light that produces compact, robust seedlings. Run these lights 14-16 hours daily for good results.
Temperature and Ventilation Management
Once seedlings emerge, you can gradually reduce humidity by venting the dome slightly or removing it entirely. Most seedlings prefer slightly cooler temperatures after germination than during the germination phase.
Air circulation becomes important at this stage. Gentle air movement from a small fan strengthens stems and reduces the likelihood of damping-off disease, a fungal problem that causes seedlings to suddenly collapse and die.
Fertilizing Young Seedlings
Seed starting mix contains little to no nutrients. Seeds carry enough stored energy to germinate and produce their first leaves, but after that, seedlings need supplemental nutrition.
Once seedlings develop their first true leaves, the leaves that appear after the initial seed leaves, begin fertilizing with dilute liquid fertilizer. Use a complete fertilizer at quarter strength weekly, or half strength every two weeks.
Troubleshooting Common Seed Starting Problems
Even with quality seed tray kits and proper techniques, occasional problems arise. Understanding common issues and their solutions keeps your seed starting on track.
Poor or Uneven Germination
If seeds fail to germinate or germinate sporadically, several factors might be responsible. Old seeds lose viability, check germination dates on packets and avoid using seeds more than a year or two old unless you know they remain viable.
Temperature affects germination dramatically. Seeds planted when conditions are too cool might sit dormant or rot before germinating. Conversely, excessive heat can prevent germination or kill germinating seeds. Verify you're providing appropriate temperatures for your specific seeds.
Planting depth matters more than many gardeners realize. Seeds buried too deeply exhaust stored energy before reaching the surface. Seeds planted too shallow may dry out before establishing roots. Follow packet directions for proper depth.
Damping-Off Disease
Damping-off causes seedlings to suddenly collapse and die, often affecting multiple plants in your seed starter tray. This fungal disease thrives in overly wet, poorly ventilated conditions.
Prevention is easier than cure. Use sterile seed starting mix rather than garden soil. Provide good air circulation with a small fan. Avoid overwatering, keep medium moist but not saturated. Remove the humidity dome once seedlings emerge to reduce humidity levels.
If damping-off appears, remove affected seedlings immediately to prevent spread. Improve air circulation and reduce watering frequency for remaining plants.
Leggy, Weak Seedlings
Tall, spindly seedlings with weak stems indicate insufficient light. These leggy plants rarely develop into strong, productive garden plants even if you eventually provide better light.
Prevention requires providing adequate light from the moment seedlings emerge. Position lights close to seedlings, just a few inches above the growing tips. Raise lights as plants grow to maintain proper distance.
If seedlings become leggy before you can improve lighting, you might salvage some by carefully transplanting them deeper than they grew in your seedling starting trays. This buries part of the stretched stem, potentially allowing stronger root development.
Transplanting Seedlings: The Final Step to Garden Success
All your careful seed starting work culminates in successfully moving seedlings from your seed tray kit to their permanent growing locations.
Hardening Off: The Critical Transition
Seedlings grown in the protected environment of seed starter trays aren't immediately ready for garden conditions. The transition from indoor protection to outdoor exposure must happen gradually through a process called hardening off.
Begin hardening off about a week before your planned transplant date. Move your seedling starting trays outdoors to a sheltered location for an hour or two on the first day. Gradually increase outdoor exposure over the following week, introducing progressively more sun and wind.
This gradual acclimatization allows seedlings to develop stronger stems, thicker leaf cuticles, and more robust root systems capable of handling outdoor conditions. Seedlings transplanted without hardening off often suffer severe shock, wilting badly or dying when exposed to sun and wind.
The Transplanting Process
When seedlings are hardened off and weather conditions are appropriate, transplant into prepared garden beds or larger containers. Water your seed tray kit thoroughly several hours before transplanting, moist soil holds together better when removing seedlings from cells.
Dig planting holes before removing seedlings from trays. Make holes slightly larger than the root balls you'll be transplanting. Water holes before planting if soil is dry.
Gently remove each seedling from its cell by pushing up from the drainage hole or carefully squeezing the cell. The root ball should pop out intact. Plant immediately at the same depth the seedling grew in its cell, with exceptions for tomatoes and some other plants that benefit from deeper planting.
Post-Transplant Care
Newly transplanted seedlings need attentive care for the first week or two as they establish in their new locations. Water gently but thoroughly after planting to settle soil around roots and eliminate air pockets.
Provide temporary shade for the first few days if transplanting into sunny locations. Even hardened-off seedlings appreciate protection from intense midday sun immediately after transplanting.
Monitor moisture carefully during establishment. Seedlings have limited root systems initially and can't access moisture from deep soil layers. Keep soil consistently moist until you observe new growth indicating successful establishment.
Maintaining and Reusing Your Seed Starter Trays
Quality seed tray kits represent an investment in your gardening success. Proper maintenance ensures years of reliable service from these valuable tools.
Cleaning Between Uses
After transplanting seedlings, thoroughly clean your seedling starting trays before storage or reuse. This cleaning eliminates disease organisms that could affect future plantings.
Remove all growing medium from cells and trays. Scrub with warm water and dish soap, using a brush to clean stubborn soil from corners and drainage holes. Rinse thoroughly to remove all soap residue.
For additional disease prevention, soak cleaned trays in a solution of one part household bleach to nine parts water for ten minutes. Rinse extremely thoroughly after bleach treatment and allow trays to dry completely before storage or reuse.
Proper Storage
Store clean, dry seed starter trays in a location protected from direct sun and extreme temperatures. UV exposure makes plastic brittle over time, while extreme heat can cause warping.
Stack trays carefully to prevent crushing or distorting cells. Store humidity domes separately or nested loosely to avoid scratching the clear plastic that allows light transmission.
Making Your Seed Starting Decision
After exploring every aspect of seed tray kits and their use, how do you decide if investing in quality seedling starting trays makes sense for your gardening?
They're particularly valuable if you've struggled with seed starting using improvised methods. The controlled environment that humidity domes and proper drainage create transforms frustrating failures into reliable success. For gardeners who've wasted money on seeds that didn't germinate or seedlings that died before transplanting, quality seed starter trays eliminate these problems.
Even occasional gardeners benefit from durable, reusable seed tray kits. The trays store compactly and last for years when properly maintained. Starting seeds successfully once or twice annually still delivers value from tools designed for repeated use.
Consider your specific growing goals. If you want to grow varieties unavailable as transplants at local nurseries, starting from seed becomes necessary. If you garden on a budget and want many plants inexpensively, starting from seed costs pennies compared to buying established transplants. If you simply enjoy the satisfaction of nurturing plants from seed to harvest, quality tools make that process more successful and enjoyable.
Conclusion: Investing in Gardening Success
The difference between gardening success and frustration often comes down to having the right tools for critical tasks. Starting seeds represents one of those critical tasks where proper equipment dramatically affects outcomes.
A quality seed starter tray isn't an extravagance, it's a fundamental tool that transforms seed germination from unpredictable to reliable. The humidity control that maintains consistent moisture, the drainage that prevents waterlogging, the individual cells that make transplanting stress-free, these features work together to create optimal conditions that improvised alternatives simply can't match.
Whether you're growing tomatoes for summer salads, starting flowers to beautify your landscape, or propagating herbs for year-round cooking, the controlled environment of proper seedling starting trays gives your plants a good possible beginning. Those strong, healthy seedlings establish quickly when transplanted, grow vigorously, and produce abundantly.
Good gardening isn't about luck or mysterious green thumbs, it's about understanding what plants need and providing those conditions consistently. Seed tray kits represent that understanding translated into practical tools that work season after season, delivering the healthy seedlings that make great gardens possible. When you see seeds germinating within days, seedlings growing strong and stocky, and transplants establishing quickly in the garden, you'll understand why serious gardeners consider quality seed starter trays essential rather than optional.
Your garden's success begins long before you harvest that first tomato or cut those first flowers. It begins the moment you plant seeds in an environment designed for their success. Give your seeds that advantage, and watch how dramatically your gardening results improve.